SimpleNext.js
How to optimize SEO with Next.js
The issue with react and SEO
When you create an application with React , all necessary HTML, JavaScript, and CSS code is either retrieved by the browser with a single page load, or the appropriate resources are dynamically loaded and added to the page as necessary, usually in response to user actions.: This is called Single Page Application.
While this is great for UX, speed ( as you don’t have to request pages from the server each time), … it comes with a major inconvenience : It makes it harder for search engine bots to crawl your code.
This is the typical HTML of a React App :
<!DOCTYPE html>
<html>

<head>
  <meta charset="UTF-8">
  <meta name="viewport"
  content="width=device-width, initial-scale=1">
  <title>Title of the app</title>
  <link rel="icon" type="image/png"
   href="/images/favicon.png" />
  <link rel="stylesheet" type="text/css"
  href="/dist/styles.css" />

</head>

<body >
  <div id="app"></div>
  <script src="/dist/bundle.js">
  </script>
<script type="text/javascript"
src="/static/js/bundle.js">
</script>
</body>

</html>
As you can seell the necessary code is contained in the JS bundles.
For a web crawler, the indexing of JS is often slower and more difficult than indexing HTML, and this will exhaust the crawling budget ( see this article for more in depth explanation)
Here comes Next.js with, among other perks, two strategies to resolve this issue :
-
Server-side rendering : In an SSR setup, you're offloading the rendering process to the backend. What is then returned to the client are fully-rendered HTML views, easing the logic on the frontend. For this reason, this approach is great for time-sensitive apps.
-
Generating static files : This lightweight process performs the action of loading all your assets into a static HTML for the crawlers to enjoy. It only executes for pages that are requested by bots, so they aren't blocked by all the JavaScript, otherwise (for regular users) everything is loaded as usual.
While you can see the difference between both modes and how to implement them here, both will serve the same purpose : the crawler will crawl multiple HTML pages rendered by the server instead of getting a single page with a big bundle of JS run asynchronously to try to understand ( even if Google claims it had become adept at it)
SEO needs technical work
Besides rendering content and indexing pages, much more technical considerations impacts your SEO :
- Loading performance and website speed (especially core web vitals)
- Mobile optimisation
- Metadata ( title, description, …)
- HTTPS
- Structure of your content ( )
- Sitemaps
- Structured data
We will see now two packages that will greatly improve your SEO by covering the Metadata, structured data and sitemap areas cited above : Next-sitemap and NextSeo
Creating sitemaps with Next-sitemaps
A sitemap is an xml file that tells the web crawler which links on your site to crawl. It greatly improves the probability that all the links that you want to be indexed will be , in comparison to when the crawler has to discover the links on your site with it’s own.
If you are using Static file generation for your project, you can use Next-sitemap to create sitemap whenever you run « npm build »
Install the package
yarn add next-sitemap -DCreate config file
next-sitemap requires a basic config file (next-sitemap.js) under your project root
module.exports = {
      siteUrl:  'https://example.com',
      generateRobotsTxt: true, // (optional)
      // ...other options
    }
Add next-sitemap as your postbuild script
{
      "build": "next build",
      "postbuild": "next-sitemap"
    }
Voila, after each build, a sitemap will be generated. You can of course exclude some pages, split the sitemap file, and many other options to discover here.
If you are using sever-side rendering and dynamic pages, creating a sitemap at build time will not cover all our links. For example if we create a blog where we fetch posts from a cms, we can create multiple posts in the cms after building the site and deploying it. Next-sitemap covers also this use case, but it will be the subject of another post , where we go in depth for this issue.
Adding seo attributes (metadata and structured data) to our pages with NextSeo
NextSeo works by including it on pages where you would like SEO attributes to be added. Once included on the page you pass it a configuration object with the page's SEO properties.
Here ’s a simple example of how it works :
Setup
First, install it:
npm install --save next-seo
or
yarn add next-seo
Add SEO to Page
Then you need to import NextSeo and add the desired properties. This will render out the tags in the
for SEO. At a bare minimum, you should add a title and description.Example with just title and description:
import { NextSeo } from 'next-seo';

const Page = () => (
  <>
    <NextSeo
      title="Simple Usage Example"
      description=
      "A short description goes here."
    />
    <p>Simple Usage</p>
  </>
);

export default Page;
But NextSeo gives you many more options that you can add. See NextSeo GitHub page for more details.
Structured data
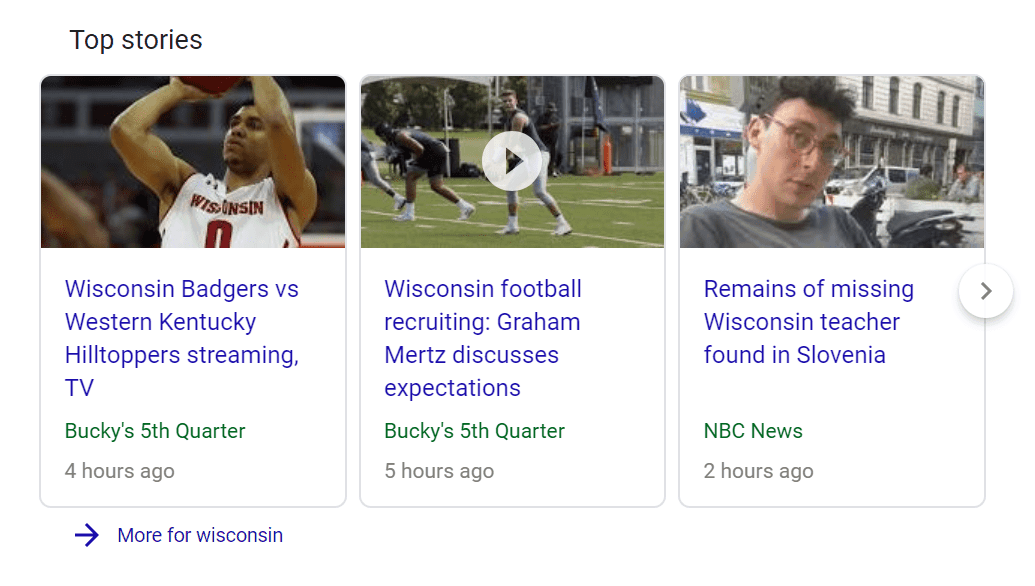
NextSEO has the ability to set JSON-LD a form of structured data. Structured data is a standardised format for providing information about a page and classifying the page content.
this will enhance your appearance on google search results, as you will appear in the results in a rich format like this:
 For this example of news article format, we can use NextSeo to achieve this result :
import { NewsArticleJsonLd } from 'next-seo';

const Page = () => (
  <>
    <h1>News Article JSON-LD</h1>
    <NewsArticleJsonLd
      url="https://example.com/article"
      title="Article headline"
      images={[
        'https://example.com/photos/1x1/photo.jpg',
        'https://example.com/photos/4x3/photo.jpg',
        'https://example.com/photos/16x9/photo.jpg',
      ]}
      section="politic"
      keywords="prayuth,taksin"
      datePublished="2015-02-05T08:00:00+08:00"
      dateModified="2015-02-05T09:00:00+08:00"
      authorName="Jane Blogs"
      publisherName="Gary Meehan"
      publisherLogo=
      "https://www.example.com/photos/logo.jpg"
      description="A description of this article."
      body="This is all text for this news article"
    />
  </>
);

export default Page;
for more informations on the formats supported (Article, recipe, blog, social profile, ..) , you can refer to this page.
Conclusion
If you know your way around React, and you need to be found on google, the best solution for you is to use Next.js, as the learning curve is small, and the SEO benefits are huge, especially when using the right tools, like NextSEO and Next-sitemap.

